How to install Proxmox VE
Overview
This guide will show you how to install Proxmox VE on a ZFS RAID1, version 6.3-3 at the time of writing.
This guide assumes that you have a motherboard and processor that supports Virtualization/VT-d and has a UEFI bios. It’s also strongly recommended that you have at least 4 CPU cores and 16GB of RAM.
It is strongly recommended that the OS is installed on at two (mirror) disks that are at least 128GB in size, but 500GB is much preferred. They don’t have to be the exact brand, but should be roughly the same size and speed. This guide also uses ZFS filesystem because of it’s extreme reliability, ability to perform easy disk replacement as well as the integrity of the data.
Hardware used in this tutorial:
- Motherboard: Supermicro X9DRL-3F/iF
- CPU: 2 x Intel(R) Xeon(R) CPU E5-2650 v2 @ 2.60GHz (2 Sockets, 32 Cores)
- RAM: 32GB (8 x 4GB) DIMM DDR3 1333 MHz ECC Memory
- OS Disks: 2 x 500GB SSDs
- Data disks: 9 x 3TB SATA Disks
- GPU: Nvidia GTX 960 SSC
Let’s get started!
Create Installation Media
PVE Prepare Installation Media Documentation
Make sure you have a USB drive that is at least 1GB in size.
Perform these steps:
- Download
PVEISO from here. - Download and install Balena Etcher
- Use downloaded ISO and install to USB drive.
Configure UEFI BIOS Settings
This part of the tutorial will likely vary in a significant way. Most Supermicro motherboards will look very similar to this. The big idea here is to make sure that these settings are set.
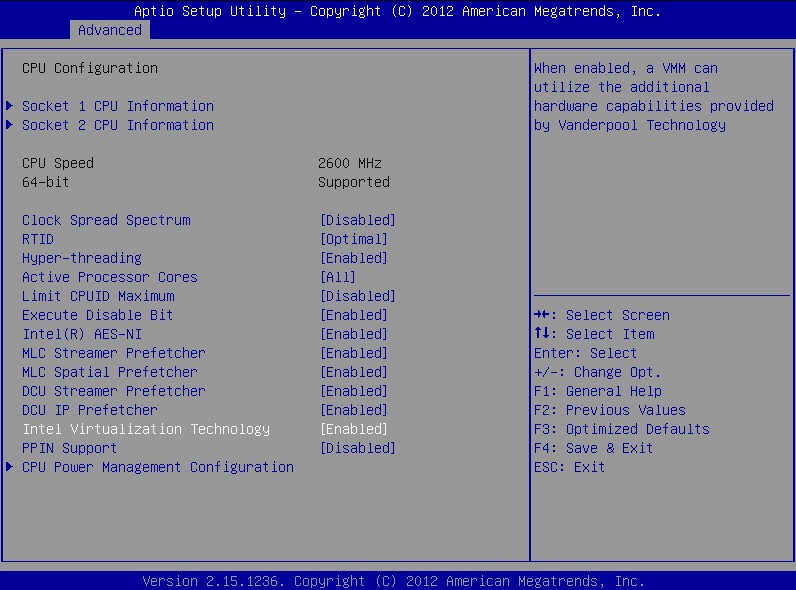
Navigate using the arrow keys to Advanced, then CPU Configuration. Be sure that Hyper-threading and Intel Virtualization Technology is set to Enabled.
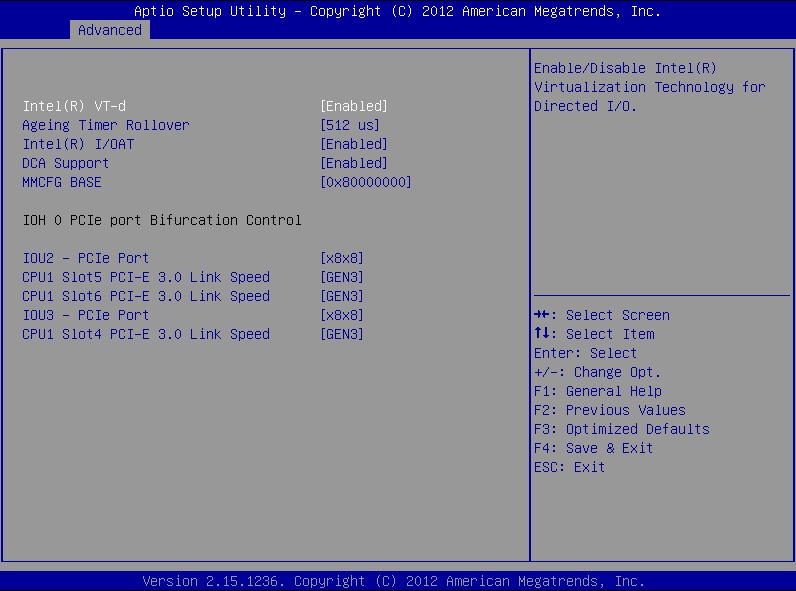
Hit Escape, then navigate to Chipset Configuration, North Bridge, then Integrated IO Configuration. Be sure that Intel(R) VT-d is set to Enabled.
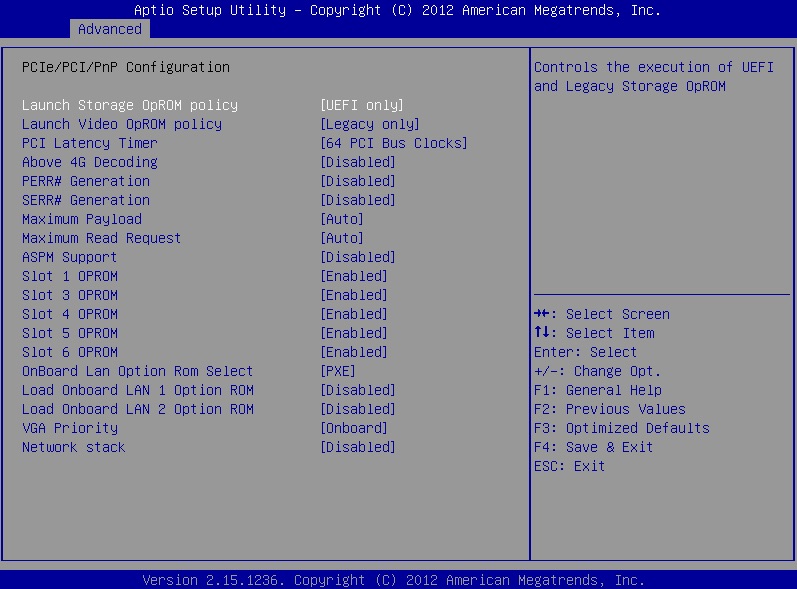
Hit Escape three times, then navigate to PCIe/PCI/PnP Configuration. Set Launch Storage OpROM policy to UEFI only, and VGA Priority to Onboard. (NOTE: The Onboard setting is especially important for PCI/GPU passthrough, but also makes using IPMI better as it will allow for full remote troubleshooting as well)
Hit Escape and use the arrow keys to navigate to Boot menu. Set the Boot Mode Select option to UEFI. Also be sure that the UEFI boot device priority to use the USB installation media, then be sure that this USB disk is set as the first boot device.

Exit and save changes and reboot.
Boot from Installation Media and Install
Follow the instructions in this guide: PVE Installation Guide
There’s no real need to go through all the instructions as they have already been documented in great detail in the link just above. However, this guide will show specific settings that will install Proxmox VE on a ZFS RAID 1.
Follow the steps until you hit the Options button.
Click on the Options button and select zfs (RAID1) from the Filesystem dropdown. (NOTE: If you only have one disk, use the zfs (RAID0) option instead, this is setting when only one disk will be used.) See this in the option below:

Once zfs (RAID1) has been selected, set Harddisk 0 and Harddisk 1 to the two disks you plan to use for the OS install. (Above you’ll see that I am using two 500GB SSDs). Be sure to select -- do not use -- for any disk you do not want to use for the OS install. Any disk used in this setup will be erased. (NOTE: Be absolutely sure you select the correct disks, otherwise PERMANENT DATA LOSS will occur.)
Under Advanced Options, the default settings below are just fine. I would just recommend verifying that compress is on.
Once finished, click OK. When that window dissappears, the screen will look like the below image. Take note that you should see the Target: zfs (RAID1) at the bottom of the screen.
Continue filling out the rest of the installation steps and information until you hit the Summary screen. Now this screen will likely be very different for you, however, this is the time to verify all your settings before proceed. After this step, there is no going back. Take note to verify that the Filesystem: is set to zfs (RAID1) and Disks(s): should contain a maximum of two disks. (Optional) It’s up to you, but I’d recommend de-selecting Automatically reboot after successful installation so that you have time to remove the USB drive.
If everything looks good, go ahead and finish the install.
Once the install has finished, remove the installation media and reboot the machine.
Final Steps
If you’re lucky, you should see a black screen with white text on it. It should give you the option to login using your root user and password. Feel free to login and check things out.
At this point, you’ll also be able to manage your new Proxmox VE hypervisor using a web browser. Open up a browser and navigate to (https://youripaddress:8006). You might have to accept an SSL exception, go ahead and do that, it’s normal. Login using root and the password you set during the install.
Troubleshooting Steps
NOTE: If it didn’t boot correctly, double check your BIOS settings and be sure that your newly installed OS is set as the 1st boot device. Be absolutely sure that it’s booting into the Proxmox VE OS in UEFI mode.
NOTE: If your OS boots into a prompt with (initramfs), this means that your OS was not able to boot from ZFS. This isn’t great, but is super easy to fix. Run the following commands:
# Manually import the ZFS root RAID1 array
zpool import -R / rpool

# Exit out and boot into the OS
exit
At this point, it should boot into Proxmox VE normally.
Review
Congratulations! You have a fresh install of Proxmox VE.
I have a setup guide article that will help you turn this basic install into a powerful all-in-one hypervisor.
Take a look at that guide here.